FAQs
Frequently Asked Questions
Profile Elite Rear Hub: Exploded Image
Ever wonder what order your Elite Internals go in?
We hope this exploded image helps.
If you have any further questions, feel free to hit up our tech dept. [email protected]
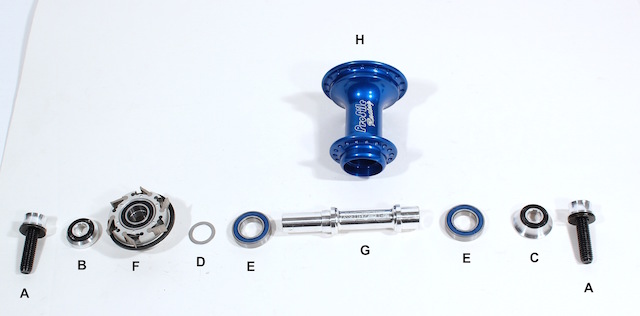
A. Bolt and Washer
B. Drive side Cone (3/8) or Drive side jam nut (14mm)
C. Non drive cone (3/8) or Non drive jam nut (14mm)
D. Driver Shim
E. Hub Body Bearing
F. Driver
G. Inner 3/8 axle or 14mm axle
H. Hub Shell
Profile ZCoaster Driver Tutorials
Here is everything you need to know about the ZCoaster driver.
Have a look and get familiar.
Thanks for the support!
Section 1.
Removal of Spiral Retaining Ring Steps:
1. Remove Flat Spring Spacer or Cassette spacer from driver.
2. Snap off open end of retaining ring with small screw driver.
3. By hand, begin to unwrap retaining ring in a CLOCKWISE rotation until it is fully unwound from driver.
Section 2.
Installation of Spriral Retaining Ring with Two-Piece Tool Steps:
1. Be sure Flat Spring or Cassette Spacer is not in driver.
2. Place conical shaped tool piece (wide side down) inside the three Spiral Ring Retainer Prongs.
3. Place Spiral Retaining Ring onto cone.
4. Place opened end of second tool piece on top of the Spiral Retaining Ring and press down until it snaps into prongs.
Section 3.
Installation of Spiral Retaining Ring by Hand.
1. Slightly spread Spiral Retaining open with fingers.
2. Place opened end of ring into one the retaining prongs.
3. In a counter clockwise motion, carefully wind Retaining Ring around the prongs until the other end is securely in place.
*Part 3 can be tricky so take your time and be careful not to bend the ring. We suggest you use the tool for this.
Section 4.
Installation of Cassette Spacer.
1. Remove Flat Spring Spacer.
2. Remove Spiral Retaining Ring.
3. Remove Slack-Cam Ring (This will not be needed when using driver as a cassette).
4. Re-install Spiral Retaining Ring.
5. Install Cassette Spacer.
*Your hub will now function as an Elite Cassette Hub.
Q and A: Which direction do my hub springs go into my driver?
This is actually a pretty common question. With no further ado, let's get to brass tax.
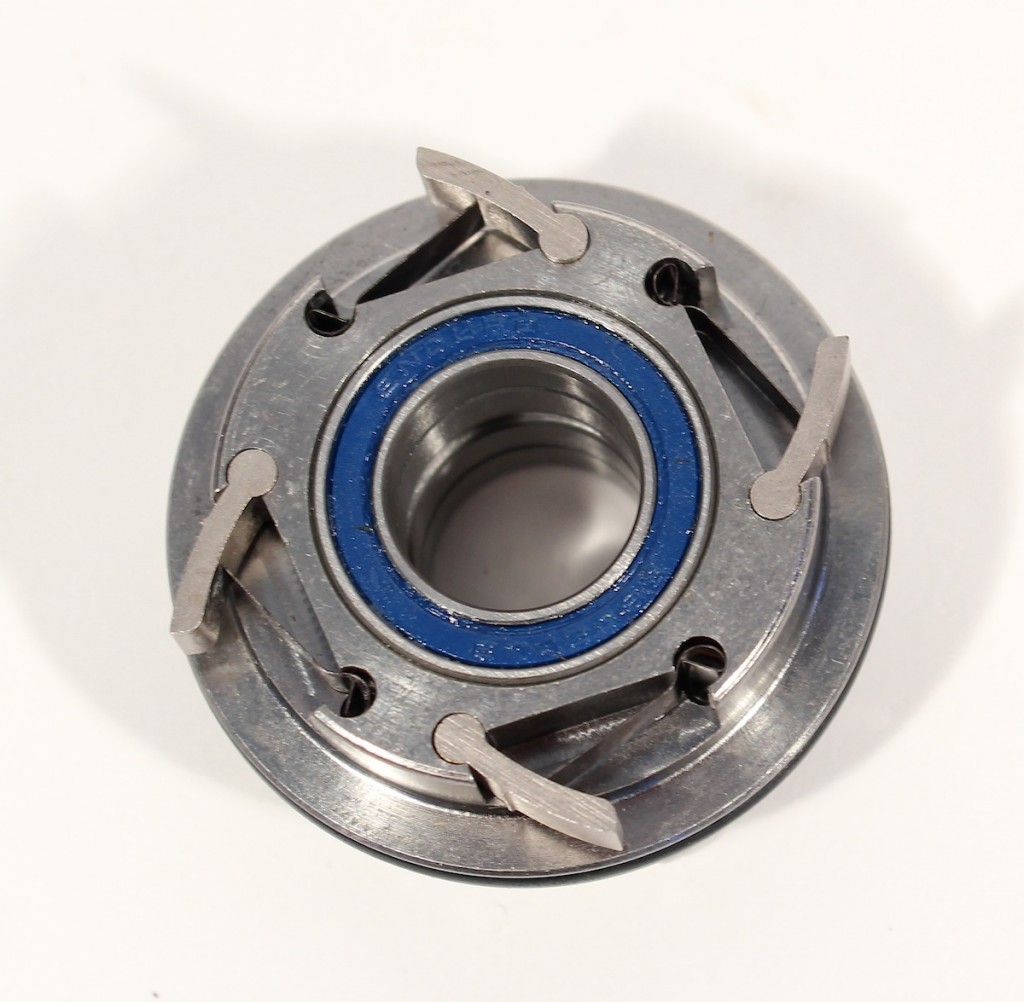
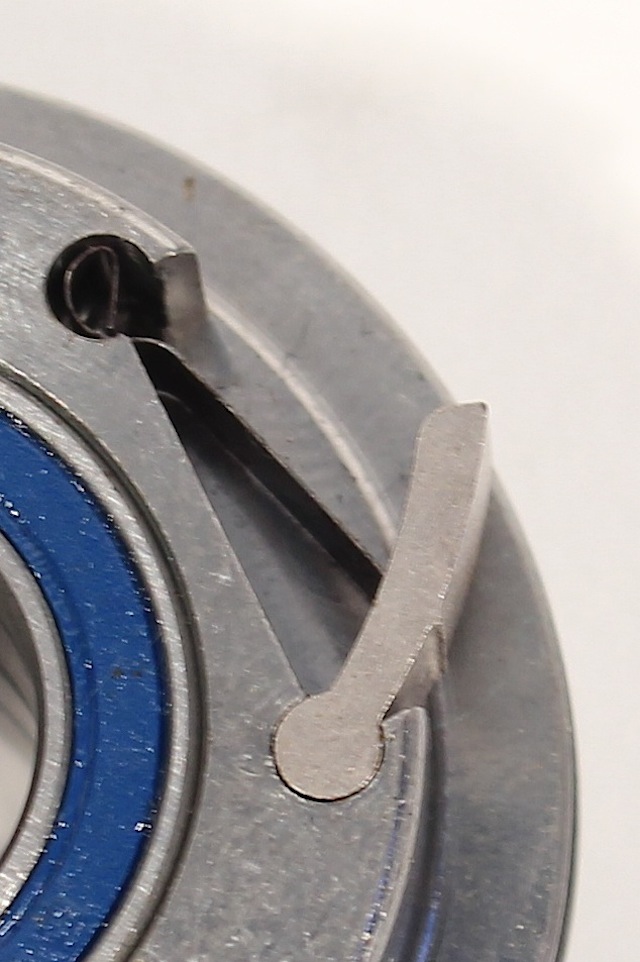
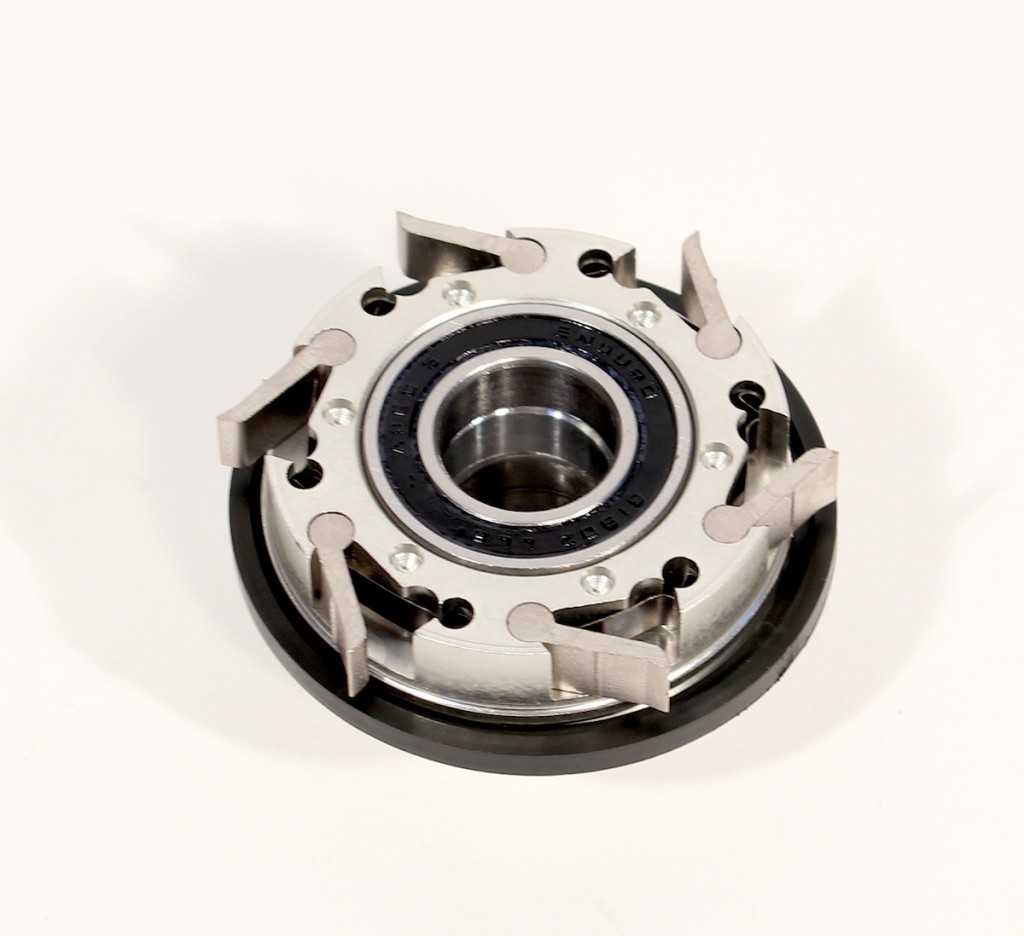
Q: For 4 pawl/4 spring Rear Madera V-2, Profile Mini, and Profile Totems?
A: Our springs are in the shape of a number nine. For these hubs, the number nine should be facing out of the driver.
Q: For 6 pawl/6 spring Profile Elite Race, 14mm GDH, and MTB?
A: Our springs are in the shape of a number nine. For these hubs, the number nine should be facing inwards towards the center of the driver.
Q and A: What is the difference between each Profile/Madera rear hub?
We get consistent inquiries asking us to differentiate between each of our rear hubs.
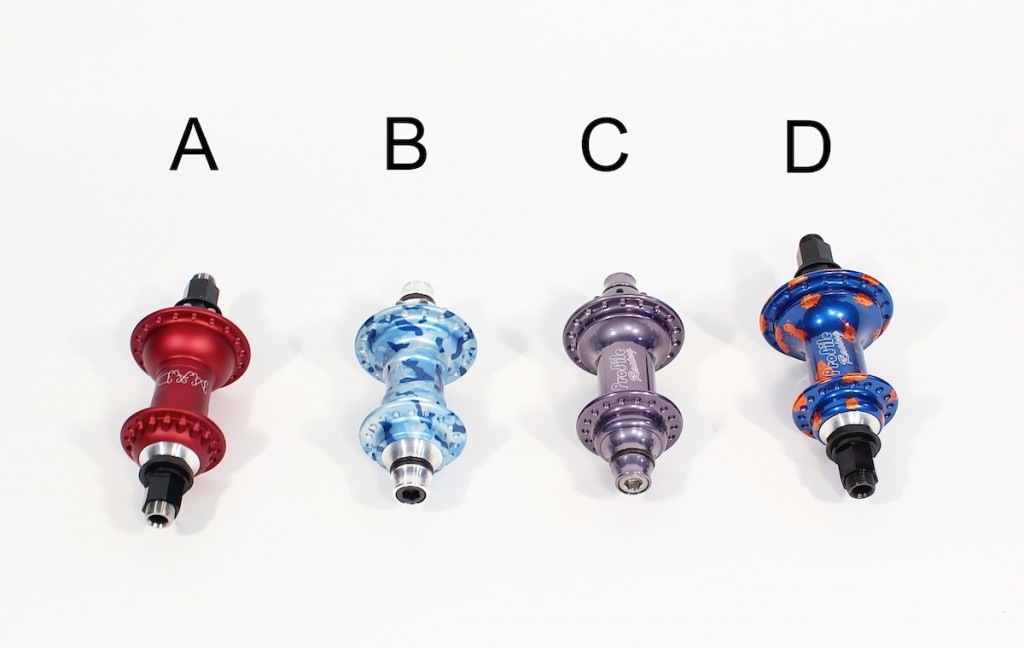
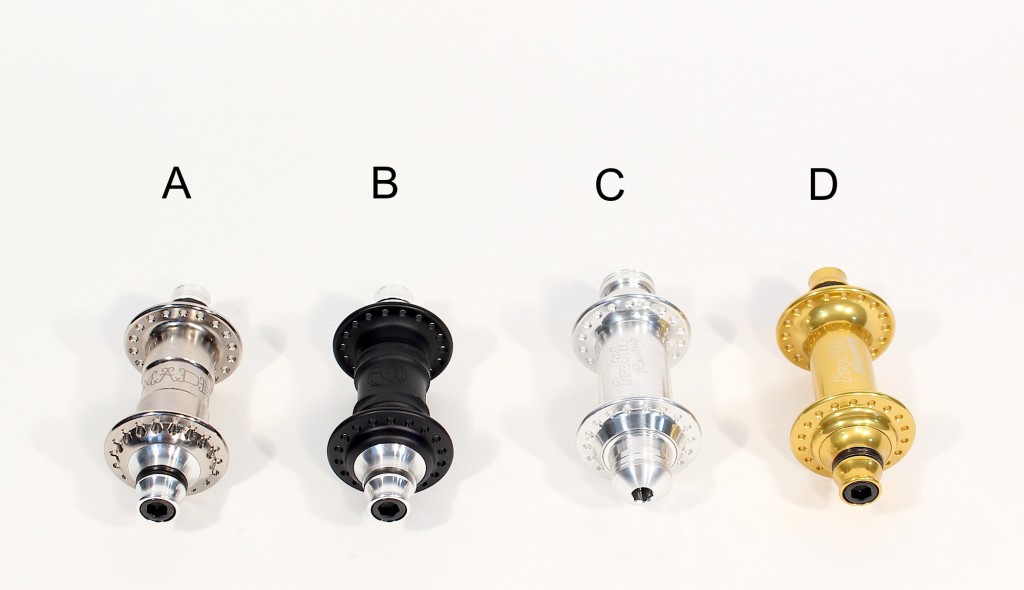
To help you out, I’ve lettered each one below followed by any questions you might have.
Hope this helps? And again, all of our product is Made in The USA.
A. Madera V-2 Rear Hub.
Q: What type of material is the center axle made from?
A: The Madera V-2 Rear hub comes standard with either a 14mm GDH chromo axle or an aluminum rear internal female axle.
For 3/8, the standard bolts are chromo 8mm allen head with aluminum volcano washers, but you can upgrade at no charge to 3/8 to 14mm chromo button head bolts or 3/8 to 14mm chromo 17mm hex bolts.
If you’re hard on rear hubs, especially on street, we recommend the 14mm chromo GDH version.
Q: For what style of riding can I use this?
A: Ramp, Street, and Race. Basically, anything.
Q: Is there an LHD version?
A: Yes.
Q: What colors does the Madera V-2 Rear Hub come in?
A: Black, Nickel, Matte Red, Rust (orange), and Matte Raw.
Q: Is the Madera V-2 Rear Hub warrantied?
A: There is a manufacturer’s warranty that covers any defects/machining issues straight out of the box.
We do offer crash replacement pricing for most issues. Please contact our warranty department.
B. Profile Mini Rear Hub.
Q: What type of material is the center axle made from?
A: The Profile Mini Rear Hub comes standard with either a 14mm GDH chromo axle or an aluminum rear internal female axle.
For 3/8, the standard bolts are chromo 8mm allen head with aluminum volcano washers, but you can upgrade at no charge to 3/8 to 14mm chromo button head bolts or 3/8 to 14mm chromo 17mm hex bolts.
If you’re hard on rear hubs, especially on street, we recommend the 14mm chromo GDH version.
Q: For what style of riding can I use this?
A: Ramp, Street, and Race. Basically, anything.
Q: Is there an LHD version?
A: Yes.
Q: What colors does the Mini Rear Hub come in?
A: Black, Matte Back, Polished, Red, Blue, Gold, Aqua, White, Green, Anti-freeze Green, Matte Army Green, and we do special colors every two months.
Q: Is the Profile Mini Rear Hub warrantied?
A: There is a manufacturer’s warranty that covers any defects/machining issues straight out of the box.
We do offer crash replacement pricing for most issues. Please contact our warranty department.
C. Profile Totem Rear Hub.
Q: What type of material is the center axle made from?
A: The Profile Totem Rear Hub comes standard with either a 14mm GDH chromo axle or an aluminum rear internal female axle.
For 3/8, the standard bolts are chromo 8mm allen head with aluminum volcano washers, but you can upgrade at no charge to 3/8 to 14mm chromo button head bolts or 3/8 to 14mm chromo 17mm hex bolts.
If you’re hard on rear hubs, especially on street, we recommend the 14mm chromo GDH version.
Q: For what style of riding can I use this?
A: Ramp, Street, and Race. Basically, anything.
Q: Is there an LHD version?
A: Yes.
Q: What colors does the Totem Rear Hub come in?
A: Black, Red, and Gun Metal Silver.
Q: Is the Profile Totem Rear Hub warrantied?
A: There is a manufacturer’s warranty that covers any defects/machining issues straight out of the box.
We do offer crash replacement pricing for most issues. Please contact our warranty department.
D. Profile Elite Rear Hub.
Q: What type of material is the center axle made from?
A: The Elite Rear Hub comes standard with either a 14mm chromo GDH axle or an aluminum rear internal female axle.
For 3/8, the standard bolts are chromo 8mm allen head with aluminum volcano washers, but you can upgrade at no charge to 3/8 to 14mm chromo button head bolts or 3/8 to 14mm 17mm hex chromo bolts.
Q: What is the difference between the Totem Rear and Elite Rear?
A: The Totem Rear Hub has 4 pawl engagement (96 points, same as a Mini), where the Elite has 6 pawl engagement (204 points total).
The Elite also has a bigger size drive side flange to fit the larger Elite driver.
Q: For what style of riding can I use this?
A: Ramp, Street, and Race. Basically, anything.
Q: Is there an LHD version?
A: Yes.
Q: What colors does the Elite Rear Hub come in?
A: Black, Matte Back, Polished, Red, Blue, Gold, Aqua, White, Green, Matte Army Green, and we do special colors every two months.
Q: Is the Profile Elite Rear Hub warrantied?
A: There is a manufacturer’s warranty that covers any defects/machining issues straight out of the box.
We do offer crash replacement pricing for most issues. Please contact our warranty department.
Q and A: What is the difference between each Profile/Madera front hub?
We get consistent inquiries asking us to differentiate between each of our front hubs.
To help you out, I've lettered each one below followed by any questions you might have.
Hope this helps? And again, all of our product is Made in The USA.
A. Madera Pilot Front Hub.
Q: What type of material is the center axle made from?
A: The Pilot front hub comes standard with an aluminum front internal female axle.
The standard bolts are chromo 8mm allen head with aluminum volcano washers, but you can upgrade at no charge to 3/8 chromo button head bolts or 3/8 17mm hex chromo button bolts.
Tried and tested (for 14 years), the aluminum inner axle is incredibly durable. However, if you would rather have a steel option, we do offer chromo inner axles as well a 14mm chromo GHD version.
Q: For what style of riding can I use this?
A: Ramp, Street, and Race. Basically, anything.
Q: What colors does the Madera Pilot Front Hub come in?
A: Black, Nickel, Matte Red, Rust (orange), and Matte Raw.
Q: Is the Madera Pilot Front Hub warrantied?
A: There is a manufacturer's warranty that covers any defects/machining issues straight out of the box.
We do offer crash replacement pricing for most issues. Please contact our warranty department.
B. Profile Mini Front Hub.
Q: What type of material is the center axle made from?
A: The Mini front hub comes standard with an aluminum front internal female axle.
The standard bolts are chromo 8mm allen head with aluminum volcano washers, but you can upgrade at no charge to 3/8 chromo button head bolts or 3/8 17mm hex chromo button bolts.
Tried and tested (for 14 years), the aluminum inner axle is incredibly durable. However, if you would rather have a steel option, we do offer chromo inner axles as well a 14mm chromo GHD version.
Q: For what style of riding can I use this?
A: Ramp, Street, and Race. Basically, anything.
Q: What colors does the Mini Front Hub come in?
A: Black, Matte Back, Polished, Red, Blue, Gold, Aqua, White, Green, Anti-freeze Green, Matte Army Green, and we do special colors every two months.
Q: Is the Profile Mini Front Hub warrantied?
A: There is a manufacturer's warranty that covers any defects/machining issues straight out of the box.
We do offer crash replacement pricing for most issues. Please contact our warranty department.
C. Elite 20mm Front Hub.
Q: What type of material is the center axle made from?
A: The Elite 20mm front hub comes standard with an aluminum internal female axle.
The standard bolts are aluminum 8mm allen head with aluminum button bolts.
Q: For what style of riding can I use this?
A: Race only.
Q: What colors does the Elite 20mm front hub come in?
A: Black, Matte Back, Polished, Red, Blue, Gold, Aqua, White, Green, and we do special colors every two months.
Q: Is the Elite 20mm Front Hub warrantied?
A: There is a manufacturer's warranty that covers any defects/machining issues straight out of the box.
We do offer crash replacement pricing for most issues. Please contact our warranty department.
D. Profile Elite/Totem Front Hub.
Q: What type of material is the center axle made from?
A: The Elite/Totem front hub comes standard with an aluminum front internal female axle.
The standard bolts are chromo 8mm allen head with aluminum volcano washers, but you can upgrade at no charge to 3/8 chromo button head bolts or 3/8 17mm hex chromo button bolts.
Tried and tested (for 14 years), the aluminum inner axle is incredibly durable. However, if you would rather have a steel option, we do offer chromo inner axles as well a 14mm chromo GHD version.
Q: What is the difference between the Totem Front and Elite Front?
A: No difference!
Q: For what style of riding can I use this?
A: Ramp, Street, and Race. Basically, anything.
Q: What colors does the Elite/Totem Front Hub come in?
A: Black, Matte Back, Polished, Red, Blue, Gold, Aqua, White, Green, Matte Army Green, and we do special colors every two months.
Q: Is the Profile Elite/Totem Front Hub warrantied?
A: There is a manufacturer's warranty that covers any defects/machining issues straight out of the box.
We do offer crash replacement pricing for most issues. Please contact our warranty department.
Q and A: Profile Hub Guard Guide
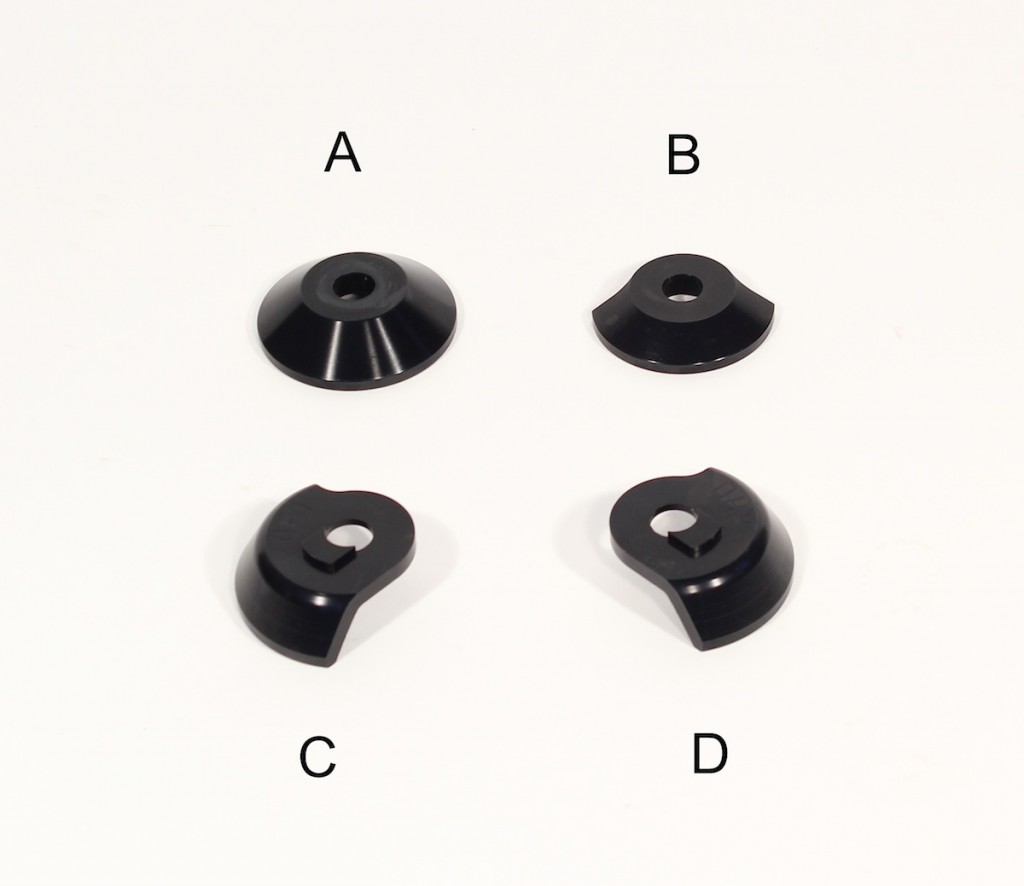
Recently we've had a lot of questions regarding our hub guards: how do you put them on, which one works for what hub, etc...
We thought it best to break it down here:
A. Rear, non-drive Aegis Guard.
Q: Which hub does it work on?
A: Profile rear Mini, Totem and Elite, as well as Madera V-2.
Q: Does it work on 3/8 and 14mm hubs?
A: Yes.
Q: How do I put the guard on my hub?
A: http://www.profileracing.com/2011/08/profile-aegis-hub-guard-installation-instructions/
B. Front, Aegis Guard.
Q: Which hub does it work on?
A: Profile front Mini, Totem and Elite, as well as Madera Pilot.
Q: Does it work on 3/8 and 14mm hubs?
A: Yes.
Q: How do I put the guard on my hub?
A: Goes on the same as the rear Aegis for 3/8 shown here:
http://www.profileracing.com/2011/08/profile-aegis-hub-guard-installation-instructions/
C. LHD Rear, drive-side Aegis Guard.
Q: Which hub does it work on?
A: Profile LHD rear Mini, Totem and Elite, as well as LHD Madera V-2.
Q: Does it work on 3/8 and 14mm hubs?
A: Yes.
Q: How do I put the guard on my hub?
A: http://www.profileracing.com/2012/06/installing-the-profile-drive-side-hubguard/
D. RHD Rear, drive-side Aegis Guard.
Q: Which hub does it work on?
A: Profile RHD rear Mini, Totem and Elite, as well as RHD Madera V-2.
Q: Does it work on 3/8 and 14mm hubs?
A: Yes.
Q: How do I put the guard on my hub?
A: http://www.profileracing.com/2012/06/installing-the-profile-drive-side-hubguard/
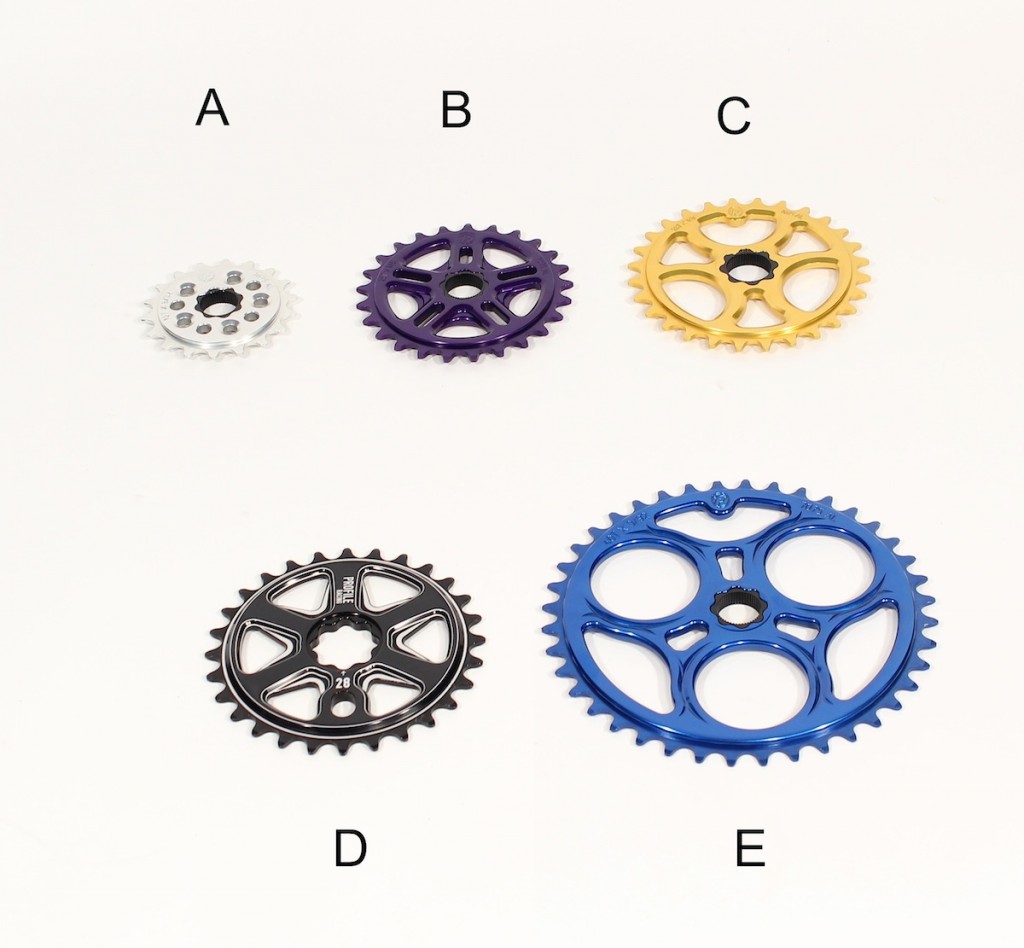
Q and A: What Spline Drive Sprocket will work for your application?
We've had several people ask the difference between each of our sprockets in our spline drive line.
We thought it best to show a visual, and with it, to describe the specifications of each.
A. Nano 19mm spline drive sprocket.
Used for flatland application. Used best on a 19mm No Boss Crank set but will work on a RHD/LHD 19mm Crank Set.
Teeth width: 3/32
Sizes: 20 and 22t
Colors: Black, Polished, Red, Blue, Gold, Purple, and Green.
B. 19mm spline drive sprocket.
Used for ramp and street application. Used best on a 19mm No Boss Crank set but will work on a RHD/LHD 19mm Crank Set.
Teeth width: 1/8
Sizes: 23, 25, 28, 30, 33, 36, 39, and 42t
Colors: Black, Polished, Red, Blue, Gold, Purple, Aqua, and Green.
C. Galaxy 22m spline drive sprocket
Used for ramp and street application. Used best on 22mm No Boss Column Crank set.
Teeth width: 1/8
Sizes: 25, 28, and 30t
Colors: Black, Polished, Red, Blue, and Gold.
D. Sabre spline drive sprocket
Used for ramp, race and street application. This sprocket is drilled for 4 separate inserts (sold separately). Each of the 4 inserts could adapt it to retro fit any 19mm or 22mm bolt-on or spline drive crank set.
The insert options are:
1.19mm Bolt-on.
2.19mm spline drive
3.22mm Bolt-on
4.22mm spline drive
Teeth width: 1/8 on 25 through 33t, 3/32 on 36 through 45t.
Sizes: 25, 28, 30, 33, 36, 37, 38, 39, 40, 41, 42, 43, 44, and 45t.
Colors: Black Only.
E. Elite 19mm spline drive sprocket
Used for race application. Used best on a 19mm No Boss Crank set but will work on a RHD/LHD 19mm Crank Set.
Teeth width: 3/32
Sizes: 36, 37, 38, 39, 40, 41, 42, 43, 44, and 45t
Q and A: Which hub axle should I choose?
Considering we make every hub axle here in our machine shop from scratch, we've been able to fill every option covering differences in riding style, durability, and aesthetic.
Below are all of our options for both front and rear Profile Mini and Totem, and Madera Pilot and V-2 hubs.
Hope this helps in making your next decision on what to get...
Front Axle configurations.
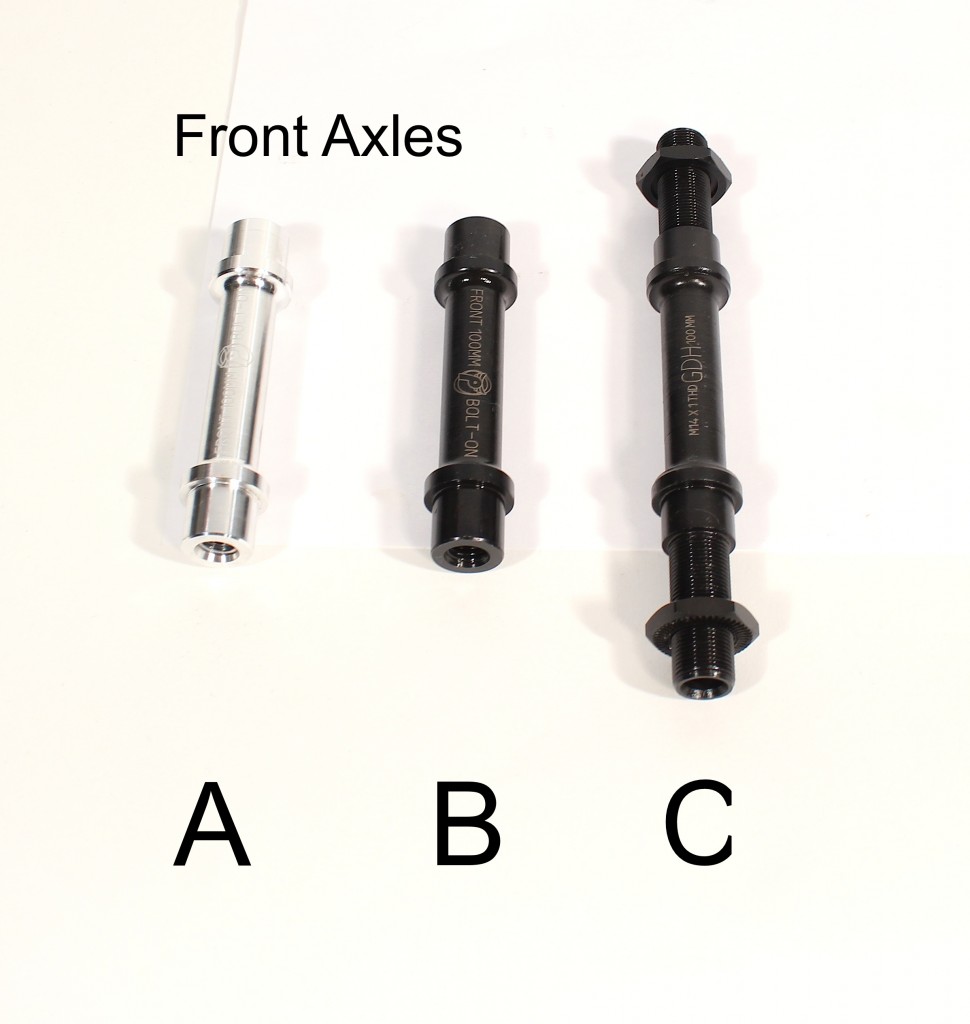
A. 3/8 aluminum front axle: This is our standard 3/8 axle that 98% of riders use.
Our whole team uses this configuration which is good for no pegs, one or two pegs.
B. 3/8 steel front axle: For use with riders who like 3/8 but are a little leery about riding an aluminum axle. This configuration is good for no pegs, one or two pegs.
C. 14mm chromo GDH axle: For use with riders who are very hard on the front wheel/pegs. If you've had a history of breaking front axles from peg use, this is your best choice.
Rear Axle Configurations.
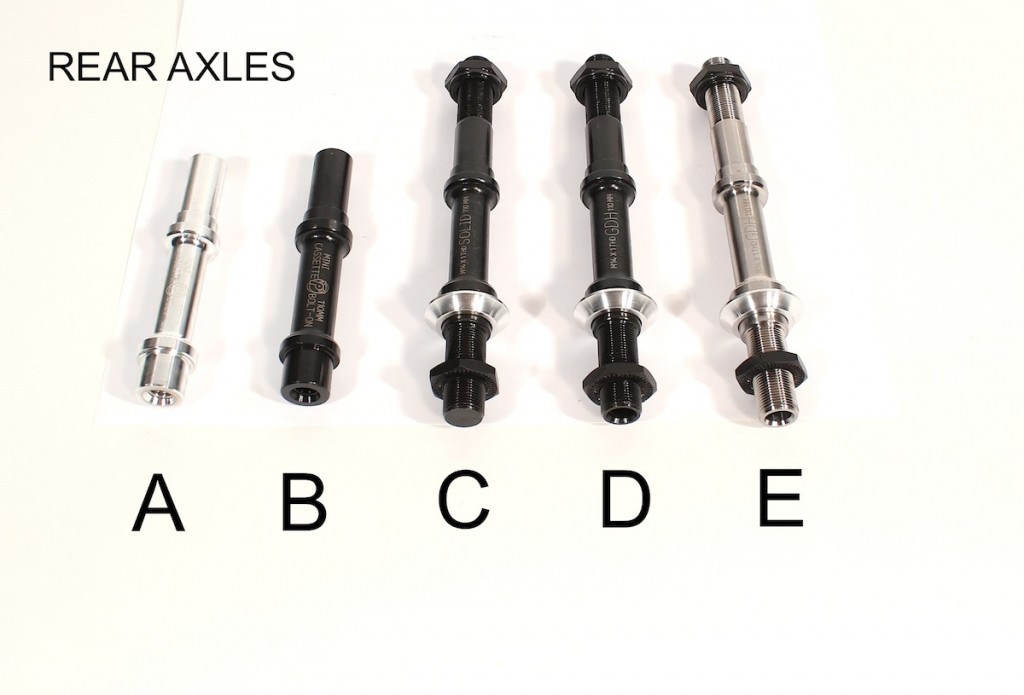
A. 3/8 aluminum rear axle: This is our standard 3/8 axle. Although you can ride pegs with this axle, it is mainly for race, trails, and peg-less street and park.
B. 3/8 steel rear axle: For use with riders who like 3/8 but are a little leery about riding an aluminum axle. This configuration is good for no pegs, one or two pegs.
C. 14mm chromo solid axle: For use with riders who are very hard on the rear wheel/pegs. If you've had a history of breaking rear axles from peg use, this is your best choice.
D. 14mm chromo hollow GDH axle: This is our standard street/park axle. This is what 98% of riders use and is good for pretty much anything: street/park/trails.
E. 14mm titanium hollow GDH axle: This would be the best upgrade for heavy park use with keeping things as light weight as possible. Although you can use this for street, we would recommend a hollow chromo GDH or solid chromo axle.
Q: Can you ride pegs on a Profile Mini Front hub? A: YES!
The Profile Mini Hubs were originally released in 2001.
Built originally for race application, the mini hubs were soon modified to accept a 14mm axle in the rear.
However, the front, with an aluminum 3/8 inner axle, has not changed much since its inception.
By 2002, the Mini Hubs became our primary freestyle ramp/street hub which can be used with pegs.
By 2008, we released the Profile Totem and Madera Pilot front hubs. All of which take the same exact Mini aluminum axle with 3/8 chromo bolts. These two additional front hubs can be ridden with pegs as well.
Last Wednesday at the skatepark I was answering some questions from the locals. Within the questions, most of them were based around the ability to ride pegs on a front Profile Mini Hub. At that point, I realized that it might not be common knowledge.
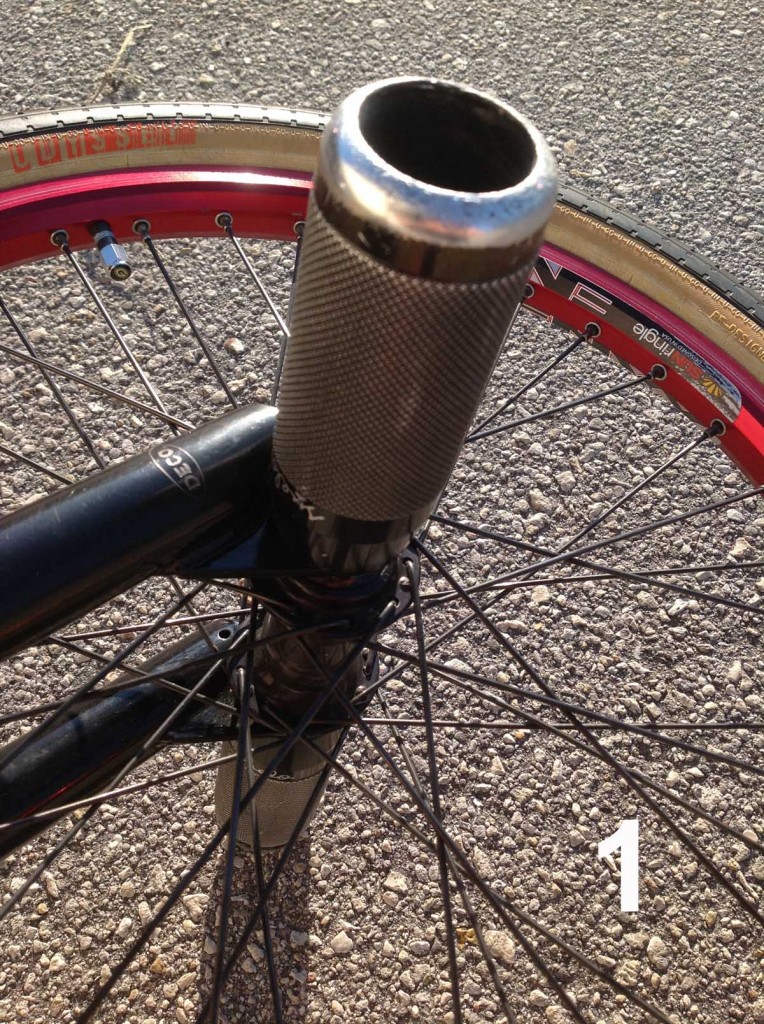
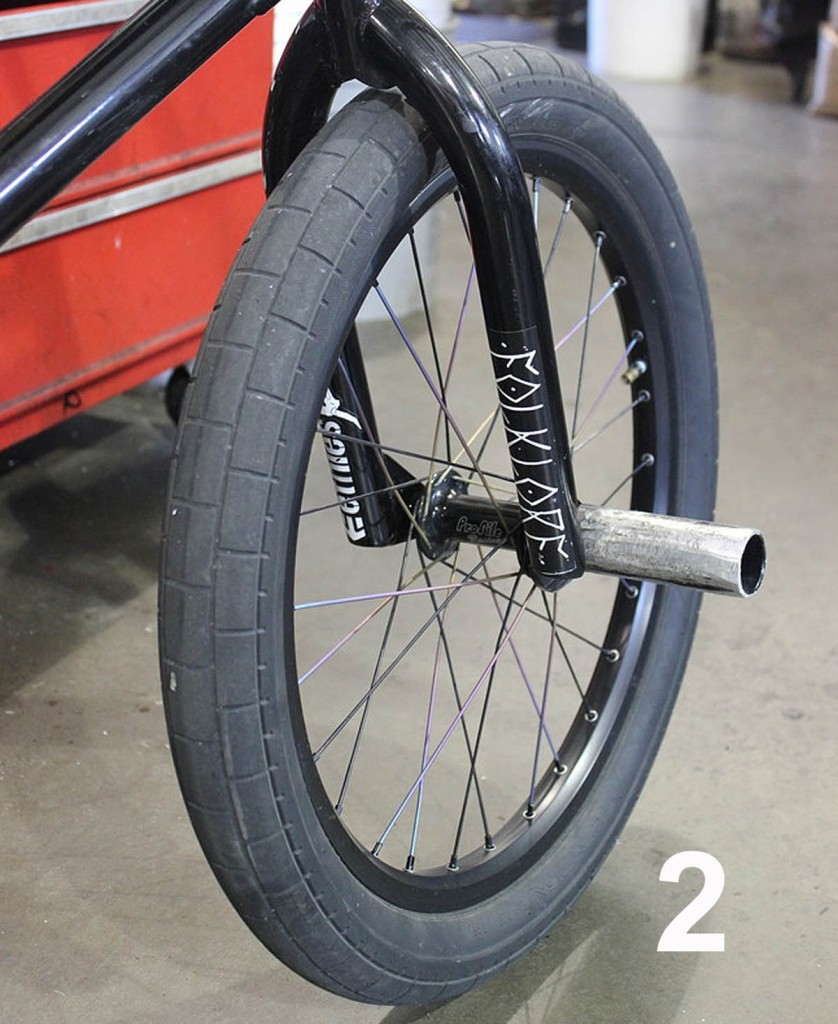
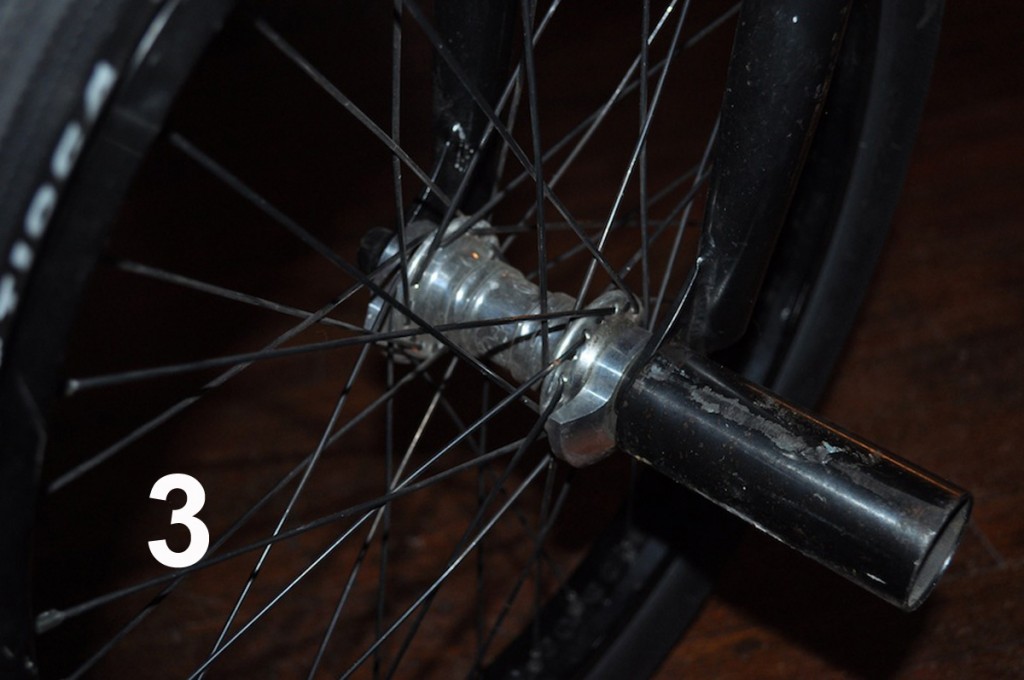
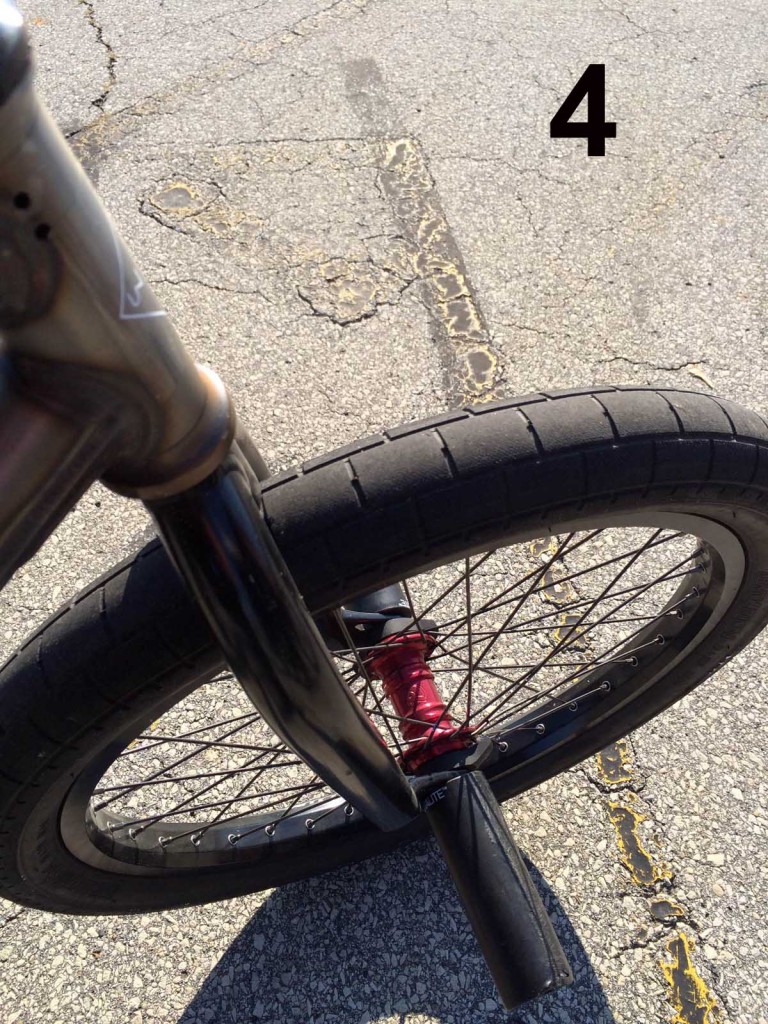
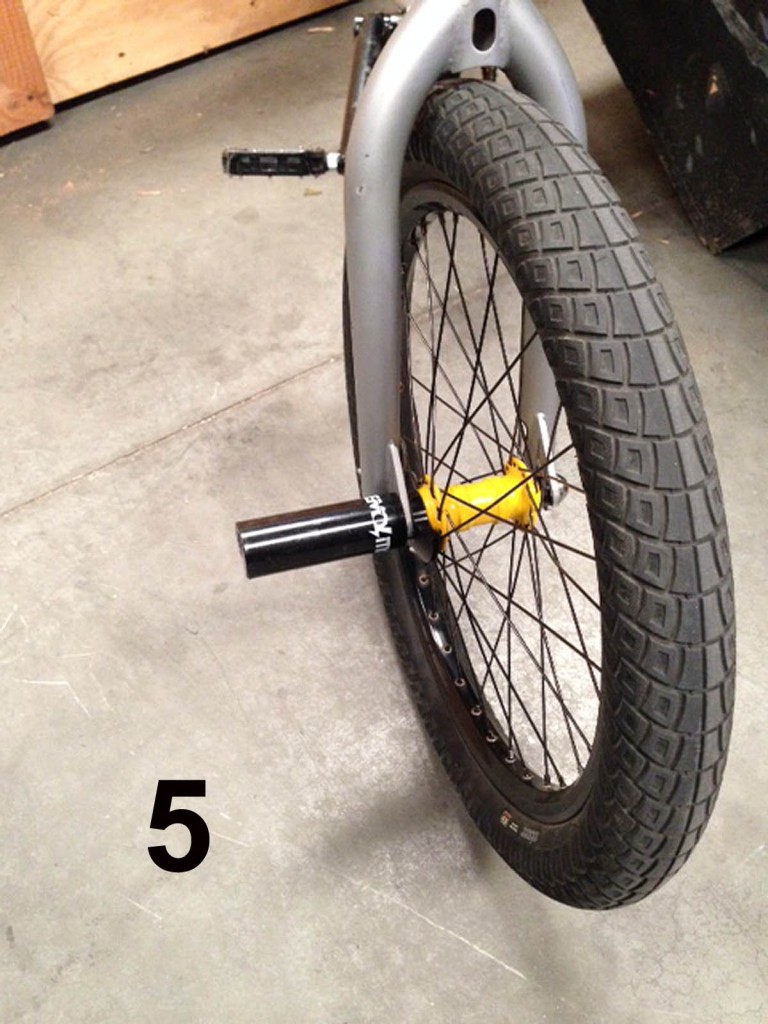
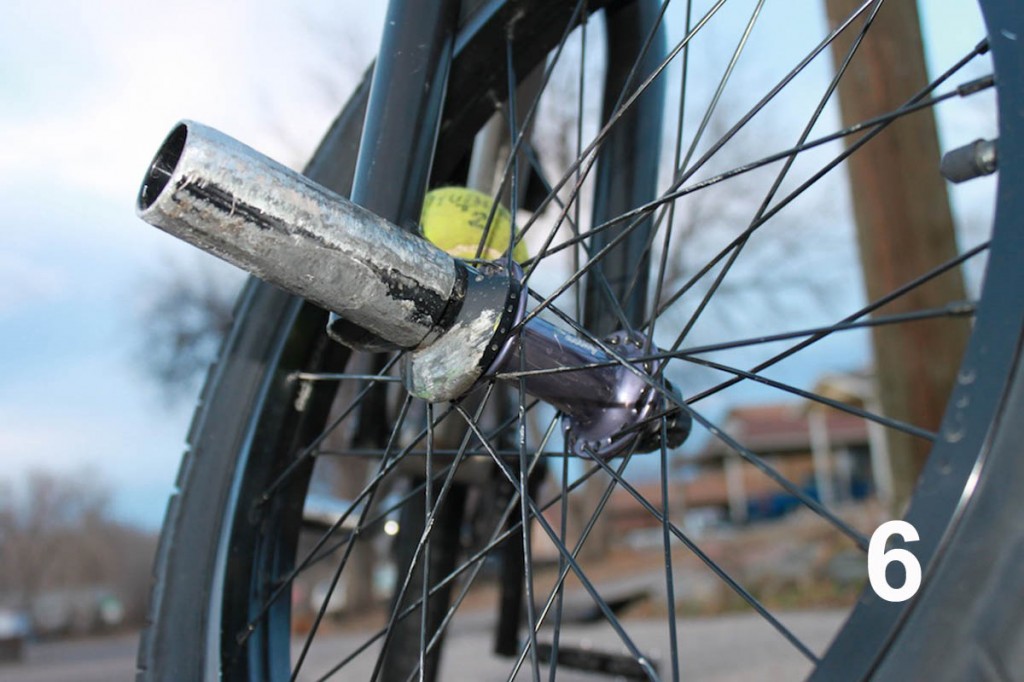
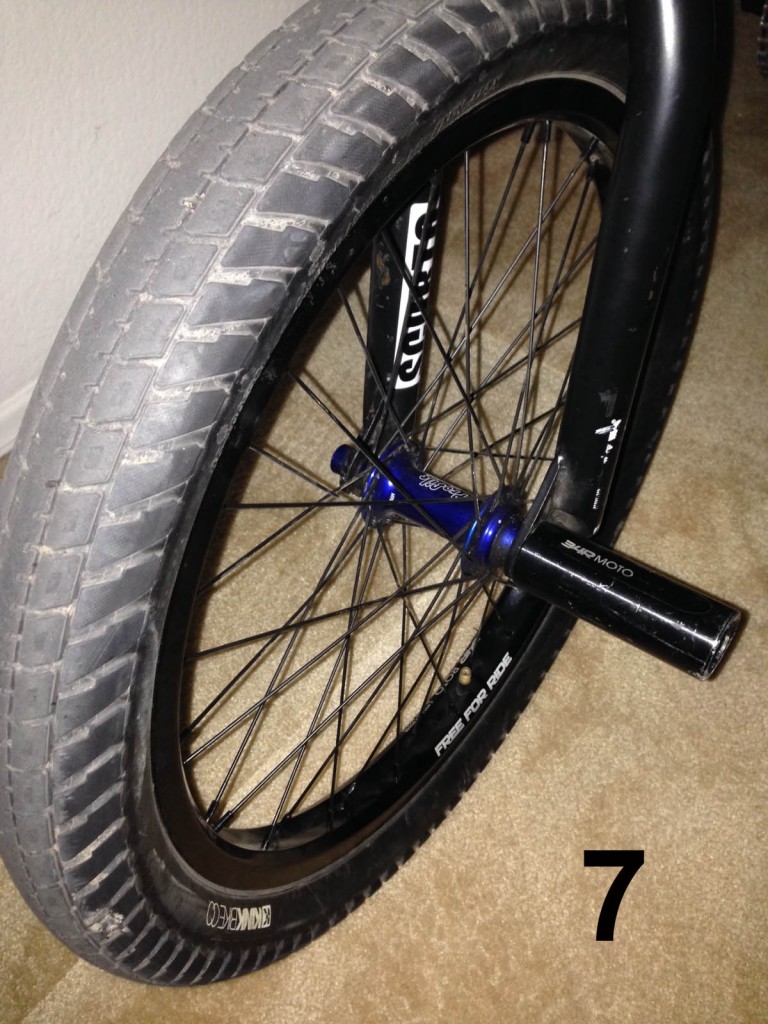
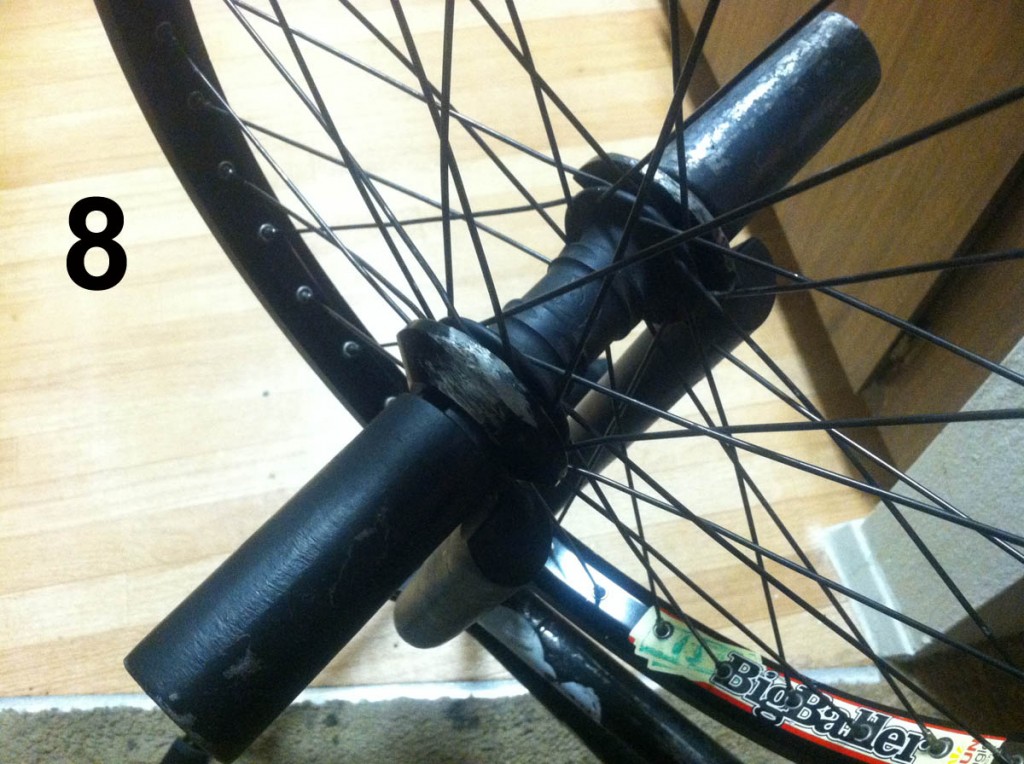
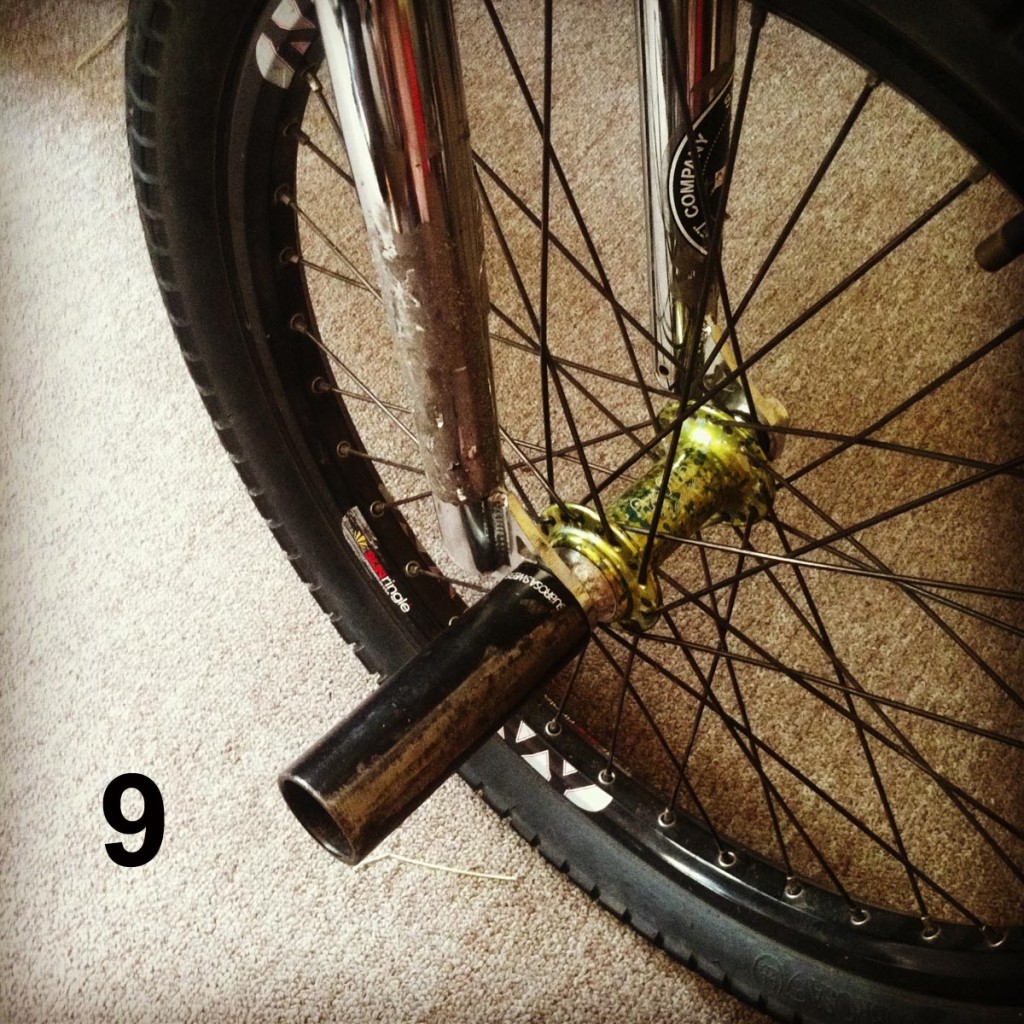
To better show the varieties of peg use, here is a photo selection of our riders' front wheels.
If you can identify each riders wheel, you will be entered to win a selection of the three newest Profile logo shirts.
Write in the rider's names next to the photo number associated with the front wheel and submit your answers to [email protected]. MAKE SURE THE WORD "CONTEST" IS IN YOUR SUBJECT LINE.
We will choose a winner by Friday 12/13.
Thanks for the support.
These are the riders' featured front wheel photos in random order:
Grant Castelluzzo, Jared Eberwein, Mark Mulville, Chad DeGroot, Rob Diquattro, Dillon Leeper, Mike Meister, Matt Coplon and Ricky Moseley.
Q & A: Can a spline drive sprocket/spider work on a crank arm with a spider boss?
Can a spline drive sprocket/spider work on a crank arm with a spider boss?
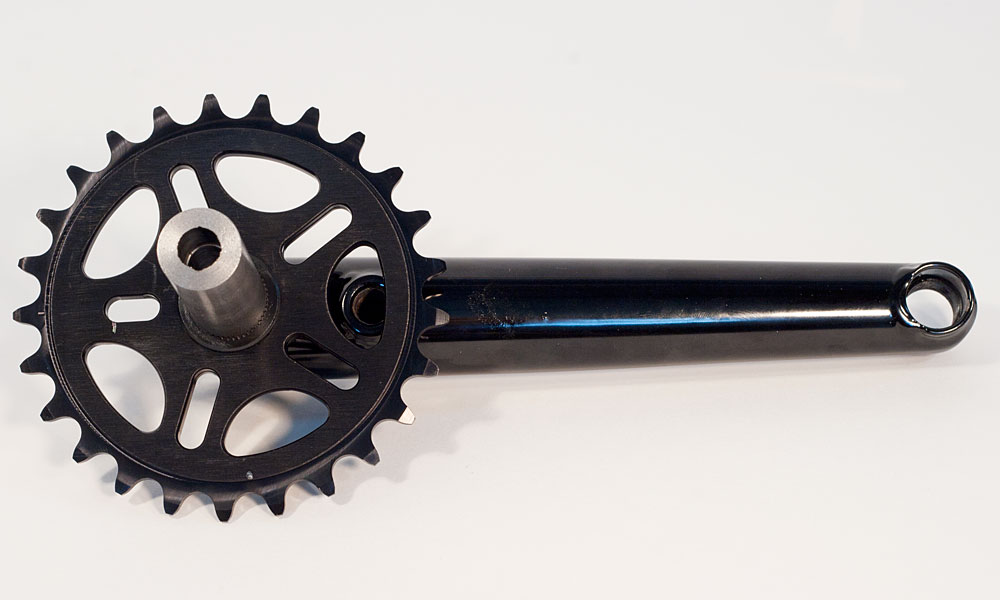
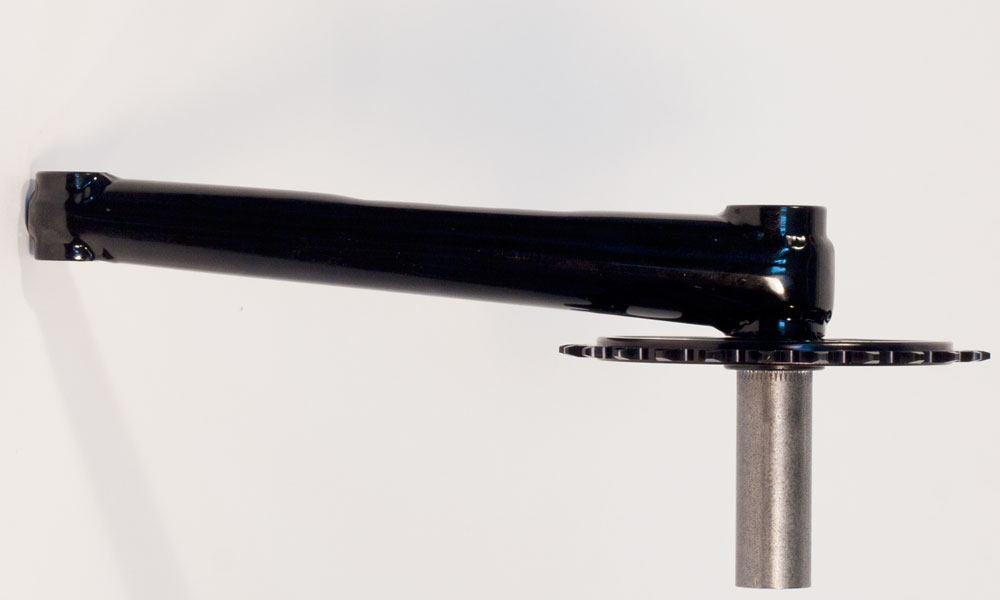
If using a crank arm with a sprocket bolt boss, the boss will sit flush against the sprocket/spider. Just make sure you take out the spider bolt.
With Profile spline drive sprockets/spiders, you can also match up (or "time") the crank's spider boss with recesses in the sprocket. Basically, the sprocket bolt boss will sit inside the cut out of the sprocket.
Regardless of how you apply it, spline drive sprockets/spiders will work with any 19mm crank set with existing sprocket bolt bosses.
Q and A: Do I need to grease my Profile cassette hub driver?
Definitely not!
Cassette drivers are designed to run dry.

Don't Do This
.
The application of grease inside the driver can cause both the springs and pawls to engage improperly. Improper engagement could cause stress on these parts causing them to bend, break, and possibly chip away at the hub shell’s ratchet ring.
Grease also attracts dirt. Dirt can gum up the works, causing a slow driver. Dirt could also potentially tear up your springs and pawls. Oily lubes also attract dirt, so they should be avoided as well.
Teflon dry-film chain lube is OK to use on your rubber "O"-ring in cases of friction (aka. a slow driver). White Lightning is a very popular brand that's available at most bike shops.
You can also apply a drop of Teflon dry-film chain lube to your pawls and pawl pockets to ease friction. It applies wet and dries to a thin lubricating film, but use it sparingly, as it will build up over time. Dry Graphite powder is also a great substance to keep your driver running smoothly.

Lube with a small drop on the top of each pawl and a few drops on the driver seal

Lube with a small drop at each pawl pocket.
Keeping the internals of your hub dry will also maintain a loud cassette noise when freewheeling. You’ve got to love a loud hub!
-Matt
Q and A: Which Spindle do I need?
We get this question all the time. Here's all the details.
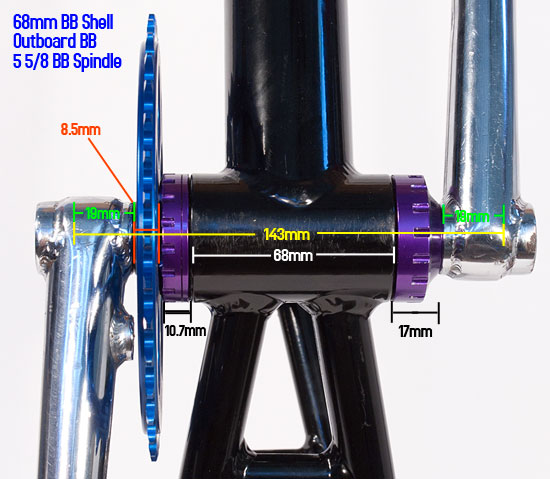
Q: Which BB Spindle do I need for my new bike using the Profile Outboard Bearing Bottom Bracket?
A: The Short Answer:
- If you have a Mid or a Spanish BB on your BMX Freestyle bike, you need the 5 5/8" spindle.
- If you have an American BB on almost any style of frame, you need the 5 5/8" spindle.
- If you are using the Outboard BB and the Spline Drive Sprocket, and you BB shell measures 68mm wide, you need the 5 5/8" Spindle.
- If you are using the Outboard BB and the Spline Drive Sprocket, and you BB shell measures 73mm wide, you need the 6" Spindle.
- If you want the narrowest Q factor possible with a 68mm BB shell, get the Internal BB and the 5 1/4" spindle. This is mostly for track (fixed gear) bikes.
The Longer Answer:
The Spline Drive Sprocket setup will leave you, if you've properly centered the spindle, 19mm on each end for the crank arms. The Spline Drive Spider is about 10mm thick, or about 1.5mm thicker than the Sprocket, meaning you'll have slightly over 18mm of spindle to hold your crank arms with. This is the minimum amount of spindle to properly support your crank arms. It doesn't hurt to have more spindle inserted into the crank bosses, but you should avoid having less.
The 5 5/8" spindle is 143mm long- the 6" spindle is 154.6mm long, so with the 6" spindle and a 68mm bb shell, you would end up with about 24mm inserted into each crank boss- the splines in each crank boss measures 27.6mm.
If you have a bike with a 73mm BB shell, as many Mountain Bikes do, you are definitely going to want the 6" spindle. I'll diagram that one up next time.
Q and A: Is Madera made in the USA?
Yes.
Madera componentry is made here in our factory on the same machines as Profile.
It has the same craftsmanship, engineering, and design.
The difference between Madera is solely aesthetic. Because we cut down on the Madera’s intricacies through production, the product line is less expensive for us to make. Therefore, Madera retails for much less than Profile.
Here’s an example of the difference through production of hub shells.

The Madera V-2 rear hub shell takes approximately 4 minutes to make.

Although the Profile mini hub shell is made on the same machine, the scalloping (design in the center of the shell) demands more machine time. The Profile Mini hub takes approximately 6 minutes to make. More time in the machine equals more cost for us to make.
Madera cranks, spline drive sprockets, and stems all fall into the same idea. More simplistic design work with absolutely no sacrifice in quality.
-Matt
Q and A: Are Profile Cranks Warrantied?
Profile started producing 3-piece cranks right in 1979. Since their introduction, Profile has offered a “Limited Lifetime Warranty” to the original purchaser.
What does that mean?
If you buy a set of Profile Cranks, inside the box is a warranty card. Fill it out, get it back here to Profile and we’ll put it on file.
The warranty card will entitle the original purchaser to a lifetime warranty covering bending or breaking of either the crank arms or CrMo (steel) spindle (granted the damage has been done under normal riding conditions).
If you do not have a warranty card on file, your receipt can also be used for a proof-of-purchase, so it’s a good idea to save both the stub of your warranty card, as well as your receipt.
For more detailed information, please click on this link.
Thanks for the support.
-Matt
Q and A: Can you ride pegs on a 3/8 Profile Mini Hub?
Profile Mini hub have been available since 2001. From the onset, starting with our team riders, pegs have been riding for both park and street on the 3/8 FRONT mini hub. Today, all of our team riders run Profile 3/8 front Mini or 3/8 front Totem Hubs and almost all of them ride pegs.
We do recommend you putting on a hub guard when riding pegs. Although many hub guards will work, the Profile Aegis guard works best (as it substitutes your existing cone spacer).
Above is a photo of Chad Degroot with an over tooth. All of your weight is applied on the front peg through this move: Chad has never broken a 3/8 bolt.
If you are not comfortable riding 3/8 on your front hub, we do offer them in 14mm.
With Rear 3/8 Profile mini hubs, we DO NOT RECOMMEND them for peg use.
However, we do offer a 3/8, steel button head Peg Bolt that is made for peg use. This bolt can be bought separate or as an upgrade with the hub. The peg bolt adapts both your 14mm peg and 14mm drop out for use with 3/8.
As with the Profile Mini front hub, we also recommend riding a hub guard with the Profile Mini rear. Most hub guards will work, however, the Profile Aegis rear guard with work on 3/8 or 14mm, and substitutes your existing non-drive jam nut and cone.
If you have any questions, please contact matt at profileracing.com
Thanks,
-Matt
Profile Aegis Hub Guard Installation Instructions
The Profile Aegis Hub guards replace the existing cones on your Profile Mini
and Totem Hubs. They are also compatible with the V.2 Madera Pilot Front and
Cassette Rear hubs.
The Rear Aegis works with 3/8 or 14mm hubs. The Front
Aegis is only compatible with 3/8 axles.
To install the Aegis on 3/8 hubs:
Remove the Axle bolt from the hub on the side you wish to install the
hubguard (or on the non-drive side of rear hubs).

Remove the cone spacer from the hub

Slide the Aegis into place where the cone spacer was, and then re-insert the
axle bolt. Put the wheel back on your bike, and go find something to grind.
If the cone spacer is "stuck" on the axle, the easiest way to remove it is to remove the axle from the hub. With the bolt about halfway threaded into the non-drive side of the hub, and your wheel out of your frame, and the drive side bolt and washer completely removed, hit the non drive side bolt with a hammer until the drive side hub bearing and driver slide free of the hub. You should now have no problems removing the cone spacer. Re-assemble the hub according to the instructions HERE.
To install the Aegis on 14mm hubs:
Loosen and remove the axle nut and the non-drive-side locknut. You will need
to have two wrenches, or you can secure the drive side of the hub- use your
axle nut and tighten the drive side onto the outside of your frame dropout.
Remove the cone spacer.
Slide the Aegis onto the axle. The hub guard takes the place of both the
cone spacer and the lock nut. Re-Install the wheel on your bicycle.
If the cone spacer is "stuck" on the axle, the easiest way to remove it is to remove the axle from the hub. With the non-drive side locknut removed from the hub, and your wheel out of your frame, hit the non drive side axle carefully with a plastic or rubber mallet or hammer until the drive side hub bearing and driver slide free of the hub. Take especial care not to damage the threads of the axle if you use a metal hammer- placing a small block of wood on the end of of the axle and hitting it with the hammer is a great way to protect the axle. You should now have no problems removing the cone spacer. Re-assemble the hub according to the instructions HERE.
More info can be found by watching this video:
BMX Union Insight: Profile Racing Aegis Hubguard from Jeff Harrington on Vimeo.
As always, if you have additional questions, please give us a call or email.
